semoga menjadi ilmu yang bermanfaat untuk orang banyak.
We are proud to release Shopping Cart, the first ever free e-commerce/ online store template with “Add to Cart” and PayPal Checkout function for Blogger. Many had a view that Blogger cannot be transformed into an online store because people thought it is just a platform for beginners and does not have features like a CMS. But, we made it possible in this template. Even though there are so many website templates for accessories, we’re the first to release a fully functional website template for selling products and that too using a Blogger platform.
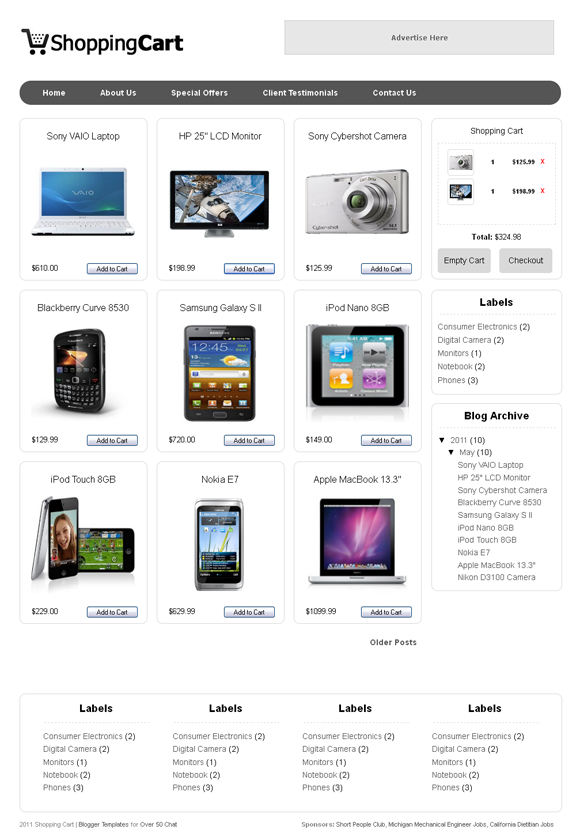
Thanks to the creators of Simple Cart script which powers entire cart functions in this template. Here is a screenshot of the blog which we set for demo purpose only.
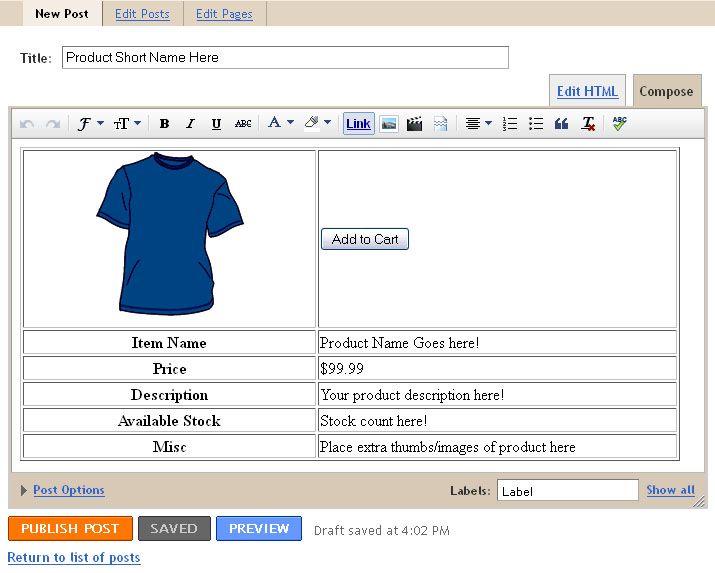
Other blogging platforms like WordPress has “Custom Fields” option which lets us to add extra description such as price and thumbnails without having to add the HTML codes in post editor. But, Blogger doesn’t have that feature. So, we at Bloggermint.com tried our best to make the item posting as easy as possible by using tables method. Here is how the table looks in post editor.
Template Usage Instructions
Using Blogger’s “Post Template” feature, we are able to pre-format the post editor with text or code that will appear each time we create a new post. So, we will make use of that feature in this template. First, download Shopping Cart Blogger template and upload it to your blog. Now, go to Settings > Formatting. Set the desired number of posts to be shown in the blog.
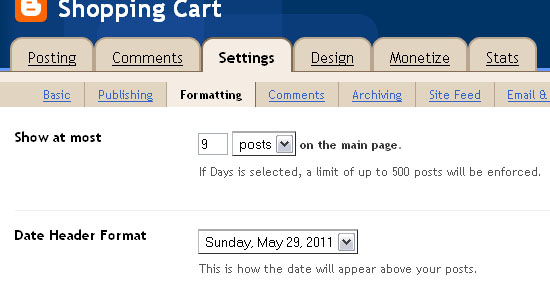
Then, scroll down the page until you see “Post Template” option. Paste the following code into the text area. And click “Save“.
<table border="1" style="width: 660px;"> <tbody> <tr> <th class="item_thumb" id="thumb" width="45%"><a href="https://blogger.googleusercontent.com/img/b/R29vZ2xl/AVvXsEhsBBR69qeZCEMnEl1CLPQZaN8VJAnR5wiTnbzzYbwDMjh2lsyEaYrZlG5XTZicOJOLpOH1BUv6PeB18W1N3J3bB6jimLPnSw01asskp8IiNlLVaCuKFKMzJ9XR58nYXJD0dEpGUT4iA_R1/s1600/blue.gif" onblur="try {parent.deselectBloggerImageGracefully();} catch(e) {}"><img alt="" border="0" id="BLOGGER_PHOTO_ID_5610175970378217570" src="https://blogger.googleusercontent.com/img/b/R29vZ2xl/AVvXsEhsBBR69qeZCEMnEl1CLPQZaN8VJAnR5wiTnbzzYbwDMjh2lsyEaYrZlG5XTZicOJOLpOH1BUv6PeB18W1N3J3bB6jimLPnSw01asskp8IiNlLVaCuKFKMzJ9XR58nYXJD0dEpGUT4iA_R1/s400/blue.gif" style="cursor: hand; cursor: pointer; display: block; height: 164px; margin: 0px auto 10px; text-align: center; width: 148px;" /></a></th> <td><input class="item_add" type="button" value="Add to Cart" /></td> </tr> <tr> <th><b>Item Name</b></th> <td class="item_name">Product Name Goes here!</td> </tr> <tr> <th><b>Price</b></th> <td class="item_price">$99.99</td> </tr> <tr> <th><b>Description</b></th> <td class="item_Description">Your product description here!</td> </tr> <tr> <th><b>Available Stock</b></th> <td>Stock count here!</td> </tr> <tr> <th><b>Misc</b></th> <td>Place extra thumbs/images of product here</td> </tr> </tbody> </table>
Here is the screenshot of post template which has been added with the code.
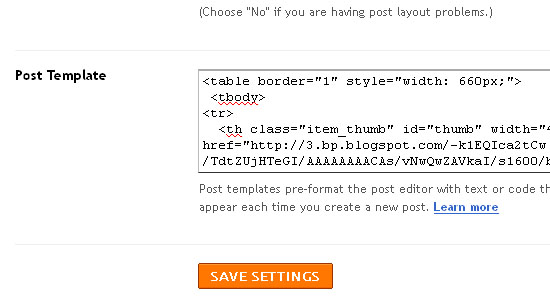
Now go to Posting | New Post and you’ll see the table there in your post editor. You can remove the default image that we have added in the code by clicking on it and select “Remove“. Then, upload your item image inside that table cell. We suggest you to use images of medium sizes.
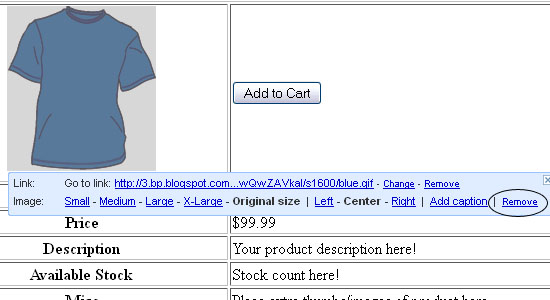
Fill in other options such as Item Name, Price and Description by replacing the default texts. They will be used as values by the SimpleCart script during the PayPal Checkout. And please remember that your Item Name must be unique. Now, click on the HTML Mode in post editor and remove the unnecessary <div>.... </div> in the code for item image. We need only the <img ... /> which has been highlighted in the image below.
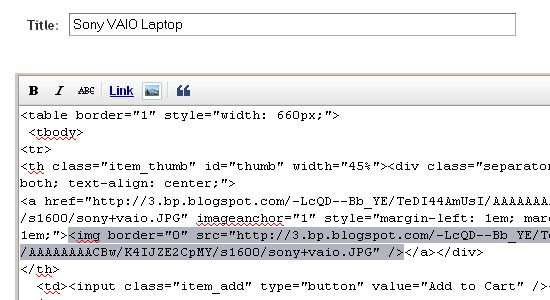
So, this is how it will look once we remove the <div>.... and <a href.... which wraps <img ... code.
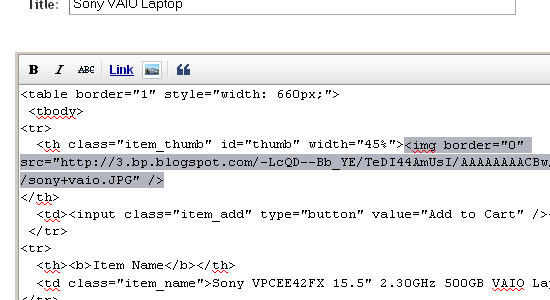
You can change it back to “Compose” mode, add/edit any information about the product and hit the “Publish” button. That’s all.
PayPal Email Setup Instructions
Go to Design > HTML. Search for simpleCart.email using CTRL + F. You will find this piece of code.
<script type='text/javascript'> simpleCart.email = "bloggermint@gmail.com"; simpleCart.checkoutTo = PayPal; simpleCart.cartHeaders = ["thumb_image" , "Quantity_input" , "Total", "remove" ]; </script>
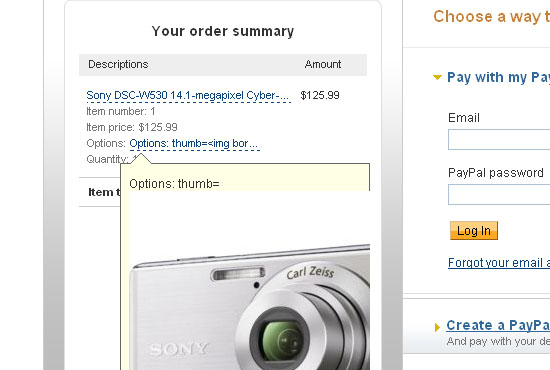
Replace the default PayPal email that we set (bloggermint@gmail.com) to yours. And Save the template. You’re done! Here is a sample screenshot of PayPal pop up window during checkout.
We have planned for a paid PRO version of this Shopping Cart with more advanced features and professional look. Please keep the footer credit links intact. If you want to remove the link you have to pay a little fee. And, if you want to get the template customized , contact us. Also check our Blogger Template site Blogger Templates Hub Blog for latest blogger templates.
Update 08/06/2011 :
For those who don’t have PayPal/credit card, you might want to use email contact form. You can replace “Add to Cart” button with a email contact/feedback form link by following the steps below. Heartfelt thanks to one of our blog reader, Vivija(Ble) from Skopje, Macedonia, who spent her time to find this method.
First, go to Kontacr.com and register for a new account. Once you logged into Kontacr, scroll down the page until you see the “Ajax Embed Widget” or “Buttons Code” and get your Kontacr ID which will look like this :- id=39662;. Copy it and keep it for the usage in the coming steps.
Now, go to Design > Edit HTML . Add the code shown below just before the closing </head> tag.
<script type="text/javascript" src="http://kontactr.com/kpu/kontactr.js"></script>
Then, search for the piece of code shown below using CTRL + F.
input.item_add{ bottom: 9px; font-size: 11px; position: absolute; right: 15px; width: 90px; }
There are two input.item_add{ codes in this template. But, you can differentiate them by looking at the CSS declarations inside { .... }. Search for the input.item_add{ code which comes earlier in CSS part. Then, replace it with this code.
span.item_add{ bottom: 9px; font-size: 11px; position: absolute; right: 15px; width: 90px; }
So now, search for the second input.item_add { code at the bottom of the CSS Part.
input.item_add { font-size: 17px; height: 40px; margin: 5px 0 0 140px; position: relative; width: 120px; }
And replace it with
span.item_add { font-size: 17px; height: 40px; margin: 5px 0 0 140px; position: relative; width: 120px; }
And now click “Save Template”. Once saved, go to Settings > Formatting and search for the “Post Template” option which is located at the bottom of that page.
Add the following code into the text area there and click “Save Settings“. But before that, remember to change the id=39662; with your ID in Kontacr which you get earlier.
<table border="1" style="width: 660px;"> <tbody> <tr> <th class="item_thumb" id="thumb" width="45%"><a href="https://blogger.googleusercontent.com/img/b/R29vZ2xl/AVvXsEhsBBR69qeZCEMnEl1CLPQZaN8VJAnR5wiTnbzzYbwDMjh2lsyEaYrZlG5XTZicOJOLpOH1BUv6PeB18W1N3J3bB6jimLPnSw01asskp8IiNlLVaCuKFKMzJ9XR58nYXJD0dEpGUT4iA_R1/s1600/blue.gif" onblur="try {parent.deselectBloggerImageGracefully();} catch(e) {}"><img alt="" border="0" id="BLOGGER_PHOTO_ID_5610175970378217570" src="https://blogger.googleusercontent.com/img/b/R29vZ2xl/AVvXsEhsBBR69qeZCEMnEl1CLPQZaN8VJAnR5wiTnbzzYbwDMjh2lsyEaYrZlG5XTZicOJOLpOH1BUv6PeB18W1N3J3bB6jimLPnSw01asskp8IiNlLVaCuKFKMzJ9XR58nYXJD0dEpGUT4iA_R1/s400/blue.gif" style="cursor: hand; cursor: pointer; display: block; height: 164px; margin: 0px auto 10px; text-align: center; width: 148px;" /></a></th> <td><span class="item_add"><script type="text/javascript"> id=39662; t=1; ctxt="Order Now"; </script> <script type="text/javascript" src="http://kontactr.com/kpu/kontactr.js"></script></span></td> </tr> <tr> <th><b>Item Name</b></th> <td class="item_name">Product Name Goes here!</td> </tr> <tr> <th><b>Price</b></th> <td class="item_price">$99.99</td> </tr> <tr> <th><b>Description</b></th> <td class="item_Description">Your product description here!</td> </tr> <tr> <th><b>Available Stock</b></th> <td>Stock count here!</td> </tr> <tr> <th><b>Misc</b></th> <td>Place extra thumbs/images of product here</td> </tr> </tbody></table>
And you’re done. I have updated the demo blog with email feedback links in several items. Thanks again to Vivija.
Update 25/07/2011 :
Due to some suspicious changes in our Google code, where we hosted our script, the Cart Javascript was not working. We have reuploaded the js file. We are are sorry for the inconvenience caused.
Search for the following code in your template HTML editor.
<script src='http://introbloggerscripts.googlecode.com/files/cart.js' type='text/javascript'/>
And replace it with the newer source URL.
<script src='http://shopppingcart.googlecode.com/files/simplecart.js' type='text/javascript'/>
Update: I am trying to get the demo URL back to the form. For some unknown reason the Demo blog wasn’t working. So I have contacted Blogger, hope they fix it soon.
Update 2: We have fixed the demo blog issue. Thanks for your patience.
If you want some new features added to the template, hire me for the customization. Hourly rates starting from $25/hr.
« Prev Post
Next Post »


